

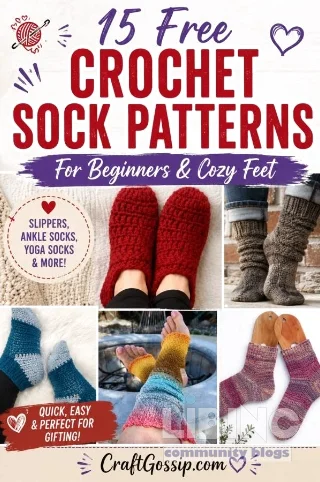
Let’s be honest about crochet socks. They carry a reputation for being fiddly, with heels, gussets, and negative ease sounding like a riddle rather than a craft. Yet the core skills are simple: crochet in the round, count stitches, and try on as you work. The real challenge is choosing the right first pattern—one that builds confidence without overwhelming you with unfamiliar techniques. This article maps the landscape of crochet socks, from lightweight ankle socks meant for inside shoes to chunky slipper socks designed for lounging. We’ll compare toe‑up and cuff‑down constructions, open‑heel and full‑coverage styles, and the various pattern families so you can pick a project that matches your feet, your yarn stash, and your patience level. The goal is clear: make crochet socks that fit, feel durable, and remain enjoyable from start to finish.
Analytics‑driven understanding of crochet socks
Crochet socks sit at the intersection of precision and comfort. The most telling metric is fit consistency across foot shapes, which hinges on gauge, stitch density, and the balance between negative ease and stretch. When you analyze patterns, you’ll see a spectrum from airy, fingering‑weight fabric intended for inside shoes to densely woven, boot‑thick fabrics meant for extra warmth. The key insight is that a successful first pair minimizes new technique requirements while maximizing educational payoff: you learn how to shape the toe, how to navigate the heel in a way that isn’t terrifying, and how to anticipate how the fabric behaves after wear and laundering.
From an analytics standpoint, the main variables are: stitch geometry, yarn weight, and the presence or absence of shaping elements (toe increases, heel turns, short rows, or afterthoughts). The more you combine negative ease with a structured cuff, the more crucial gauge becomes. A single miscount in the gauge swatch can cascade into an ill‑fitting sock, especially in high‑stitch‑count patterns or when using a yarn with a tendency to bloom. For wearable crochet socks, fingering‑weight sock yarn with nylon reinforcement (roughly 20–25% nylon) tends to balance softness with durability, while open‑heel designs and tube constructions reduce shaping complexity—great for beginners and quick wins alike.
Within this framework, patterns fall into predictable categories. Traditional cuff‑down patterns emphasize a fitted leg with a ribbed or textured cuff, often including a heel flap or short‑row heel. Toe‑up designs foreground the toe shaping and a long, adjustable foot, frequently incorporating a short‑row or afterthought heel. Slipper socks trade some anatomical realism for warmth and forgiving sizing, while tube and open‑heel models sidestep heel shaping altogether. The conclusion from the data is pragmatic: choose a pattern that aligns with your current skill set, then gently introduce a new technique only when the payoff is clear and the risk of misfit is minimized.
Skill thresholds and beginner paths
- Toe‑up simple patterns create a natural learning arc: start at the toe, monitor length as you go, and progressively add the foot, heel, and cuff. This is a steady entry point for crochet socks.
- Tube socks remove the heel turn from the equation, offering a forgiving path for absolute beginners who want a finished wearable result early.
- Slipper socks emphasize warmth and bulk, which lowers expectations for precise fit but raises the bar for comfort and durability in home wear.
Material performance and durability
Durability hinges on fiber choice and construction. Sock yarns with nylon reinforcement resist wear at the ball and heel, while wool blends offer warmth and moisture handling. For slipper socks, worsted to bulky weights provide cushioned comfort, but you still want a fabric that withstands frequent washing. The decision matrix typically looks like this: inside‑shoe socks pair best with fingering weight, nylon‑reinforced yarn; house slippers thrive on worsted or bulkier blends with good stitch definition to preserve fabric integrity over time.
Construction contrasts: toe‑up, cuff‑down, tube, and more
This block contrasts the major construction philosophies, focusing on what each brings to the table in terms fit, ease, and project pace. The goal is not to crown a single method as superior, but to illuminate which method aligns with your feet, your patience, and your end use for crochet socks.
Toe‑up versus cuff‑down
- Toe‑up patterns start at the toe and work toward the cuff. Pros: adjustable length, easier to avoid running out of yarn, natural progression through heel shaping. Cons: the toe begins with increases that require careful counting and sometimes complex short‑row work.
- Cuff‑down patterns start at the cuff and work toward the toe. Pros: familiar starting point for knitters, straightforward leg shaping, easier to fit the cuff to the ankle. Cons: length is harder to gauge if you miscount or misjudge the toe/foot proportion, potentially wasting yarn.
When choosing between methods, consider your goal: if you want to maximize length control and adjust fit as you go, toe‑up is often the better choice. If you want to replicate a familiar sock silhouette with predictable cuff behavior, cuff‑down may be preferable. Either way, you’ll want to gauge early and check the fit frequently as you build the leg and cuff.
Tube socks and open‑heel designs
- Tube socks forego a traditional heel entirely, producing a comfortable, all‑around fit but with a bulkier heel seam that may feel cumbersome in shoes. Best for lounging or bed socks.
- Open‑heel styles (yoga socks or barefoot exercise socks) provide grip and flexibility, reducing bulk under the foot and enabling use in dance, yoga, or pilates environments. They are less suitable for wearing inside tight shoes but excel for certain activities and gifts.
The trade‑off here is comfort versus support under specific footwear. If you plan to wear crochet socks with shoes, avoid purely open‑heel designs; if your primary use is at home or for exercise with grip, open‑heel patterns are attractive for their practicality.
Slipper socks versus wearable socks
- Slipper socks emphasize warmth, cushioned soles, and a forgiving texture. They can be quick to crochet with chunky yarns and are excellent for gift knitting during cold months.
- Wearable socks focus on foot conformity and a durable fabric, often using fingering or light sock yarn and a tighter stitch pattern to create a sock that can be worn with shoes.
Understanding the intended environment for your crochet socks helps narrow your pattern selection. If your feet live in shoes most of the day, start with a wearable, snug pattern using sock yarn. For cozy evenings and gifting, a chunky slipper sock pattern can be both satisfying and practical.
Causes and effects: gauge, yarn, and heel shaping matter
Patterns encode a series of decisions: the gauge you achieve, the yarn you select, and the way you shape the toe and heel. Each choice cascades into the final fit and wearability. Grasping cause and effect here empowers you to adapt patterns to your exact foot geometry and lifestyle.
The role of gauge
Gauge equality—stitches per inch—determines circumference. A mismatch between your gauge and the pattern gauge changes the final sock’s size dramatically. The difference of a few stitches across four inches can turn a snug sock into a loose one or compress the foot uncomfortably. The antidote is a proper gauge swatch done with the same yarn, hook, and stitch pattern used for the project, washed and dried as the finished garment will be. If your gauge is looser, drop a hook size; if tighter, go up a size. Don’t rely on the stated hook alone; tension varies from person to person, and yarns relax differently after laundering.
This is not a minor adjustment; it’s the hinge on which the fit depends. The majority of fitting issues between pairs come from gauge drift rather than measurement error in foot size. A disciplined swatching routine pays off in predictable sock scales and reduces post‑project frustration.
Yarn characteristics and sock behavior
- Fingering weight sock yarn with nylon offers a balance of softness, resilience, and wash durability. The nylon reinforcement is the workhorse under the foot and across high‑friction zones.
- Wool blends provide warmth and moisture management; if you choose them, ensure the yarn has enough nylon or polyamide to resist pilling and wear in the heel and toe.
- Non‑shedding or low‑fuzz yarns are ideal for crochet socks because stray fibers can migrate and itch; instead, pick yarn with a tightly spun foundation and minimal fluff.
Slipper socks and larger‑weight projects benefit from washable wool blends or durable acrylics, which tolerate frequent washing and rough wear. The fiber choice directly influences care requirements and the sock’s lifespan under repeated use.
Heel shaping impact on fit
- Short‑row heels distribute stitches more evenly around the heel, reducing bulk while maintaining a snug fit. They work well with light to mid‑weight yarns when the pattern includes clear row counts.
- Afterthought heels are easier to implement for beginners but tend to feel less integrated with the fabric, which can affect durability if not reinforced with an appropriate stitch pattern.
- Gussets and heel flaps offer traditional contours for foot shapes with higher arches or wider heels, at the cost of increased pattern complexity.
The take‑home message is that heel construction is not just about finishing; it shapes how the sock rides on the foot. A well‑designed heel reduces slippage and pressure points, turning an otherwise ordinary crochet sock into a comfortable everyday wearer.
Expert reconstruction: practical guidance for patterns and finishing
This final block translates theory into a pragmatic path for selecting patterns, planning a first project, and finishing with confidence. The aim is to help you bypass common traps—overly fussy cables for a first pair, too‑slippery yarn, or an aggressive heel that fails after the first wash. You’ll learn a staged approach that builds skill while delivering usable socks soon after you start.
Step‑by‑step beginner plan
- Identify your goal: do you want lightweight ankle socks for sneakers or warm slippers for cold mornings?
- Choose a pattern family: start with a toe‑up simple sock or a tube sock to minimize complex shaping.
- Swatch and match: create a gauge swatch in the required stitch pattern and wash/dry it; compare to the pattern gauge and adjust accordingly.
- Test fit early: try the sock on as you work the toe and foot; adjust length before proceeding to the heel and cuff.
- Finish with care: weave in ends neatly along the sides and consider blocking to smooth the fabric without distorting the shape.
Troubleshooting and common problems
- Socks are too loose: check gauge, reduce the pattern size, or switch to a denser stitch or smaller hook.
- Heel feels tight: the instep might be high; add extra stitches or a deeper heel diagram and ensure the cuff is not overly tight.
- Soles feel lumpy: avoid yarn joins directly under the foot; weave ends along the sides rather than across the sole when possible.
- Socks are too thick for shoes: favor fingering weight yarn and a dense but flat stitch; reserve worsted or bulky yarns for slipper socks.
- One sock is larger than the other: count rounds and rows precisely; maintain notes to reproduce the second sock with parity.
Finishing touches and care
Finishing matters as much as starting well. A neat edging, tidy seam lines, and even ends prevent discomfort during wear. For care, washing guidelines can determine how the fabric settles: some yarns bloom after washing, changing the circumference by a stitch or two per inch. Plan to wash swatches, then apply the same cycle to the final pair to ensure consistent fit across the life of the socks.
The craft of crochet socks rewards disciplined technique combined with practical experimentation. Start with a modest project that teaches fit, then gradually introduce elements like cables or advanced heel work as your confidence grows. The journey from beginner to proficient sock crocheter is a sequence of small, well‑understood steps, each one expanding your toolbox and your patience in equal measure.
As you finish, you’ll find that crochet socks are not merely a way to use yarn—they become a compact, portable project that sharpens your ability to shape, gauge, and finish a fitted garment. And when you finally slip a well‑fitted pair onto your feet, the learning arc will feel remarkably short, given how much you’ve gained in technique and confidence.
More patterns await those who want to deepen their practice. If you still crave variety, you can explore a curated selection of free crochet sock patterns, including toe‑up patterns with extended sizing, and video‑guided tutorials that reinforce the fundamentals while expanding technique choice. The universe of crochet socks is large, but with a disciplined approach, you can master it one pair at a time.
Takeaways: Begin with a simple, well‑fitting design to learn key constructs. Measure, swatch, and compare gauge early. Choose yarn with durability for wear in shoes or comfortable warmth for slippers. And always finish with care to maximize wear and satisfaction from your first crochet socks to your latest pair.
The best part is that crochet socks are a practical, portable project that rewards patience with a durable, personalized garment. Start with a straightforward pair, measure carefully, and adjust as you go. Soon you’ll understand why so many crocheters become hooked on handmade socks—and you’ll have a repertoire of patterns to prove it.
For further exploration, consider integrating the following terms into your practice: crochet socks, toe‑up crochet socks, cuff‑down crochet socks, negative ease, gauge swatch, sock yarn with nylon, open‑heel socks, slipper socks, heel shaping, and two‑color cuff patterns. Each adds a layer of sophistication to your evolving sock design vocabulary.
Ultimately, the value of crochet socks lies in the disciplined simplicity of the fundamentals—the toe, the foot, the heel, and the cuff—executed with care and curiosity. The more you practice, the more you’ll recognize that the journey is not about conquering a single perfect pattern, but about developing a reliable process you can apply to mittens, hats, and other tailored projects as you grow as a crocheter.
Ready for your next step? Start with a simple ankle sock or a tube sock, measure as you go, and let your stash guide your choice. The path from a timid first pair to confident, wearable crochet socks is a series of careful decisions that add up to a satisfying craft experience.
Practical pattern selection and fit workflow
To close the gap between theory and real‑life results, use a compact decision flow that starts with your goal and ends with a comfortable, durable sock. Define whether you want a lightweight ankle sock for sneakers, or a warm slipper for lounging; then pick a pattern family aligned with your yarn and skill. A precise gauge swatch, done with the exact yarn, hook and stitch, and washed/dried as the finished piece will be, reveals the pattern gauge and how the fabric behaves after wear. Use this to adjust size before the heel and cuff, and test the toe circumference as you go to prevent overlong feet or tight instep.
| Pattern family | End-use | Gauge | Pros | Cons |
|---|---|---|---|---|
| Toe-up simple | Inside shoes | 8-9 st/in | Length control | Toe increases |
| Cuff-down wearable | Shoes/bare feet | 9-10 st/in | Simple leg shaping | Length gauge |
| Tube/open-heel | Lounging | 8-9 st/in | No heel turn | Bulkier heel seam |
| Slipper socks | Home wear | 6-7 st/in | Cushioned warmth | Less snug |
Middle note: once you target your pattern, test fit by joining the toe and trying on the partially completed sock. If the circumference feels loose, adjust by a denser stitch or a size down; if it’s tight, switch to a larger hook or add a round of negative ease at the cuff.
| Swatch step | What to do |
|---|---|
| Choose yarn and hook | Match project tension |
| Crochet 4x4 swatch | Pattern stitch + gauge |
| Wash/dry swatch | Observe changes |
With these steps, you translate theory into a first sock that truly fits and wears well, then expand to more complex heels or cables as confidence grows. LSI keywords: gauge swatch, sock yarn with nylon, toe-up crochet socks.
The practical path ends with a first wearable: start simple, measure rigorously, and let the yarn and pattern guide you toward steady improvement.
What yarn is best for crochet socks?
The direct answer is that fingering‑weight sock yarn with nylon reinforcement offers the best balance of softness, durability, and washability. In practice, look for a yarn labeled sock yarn with roughly 20–25% nylon, ensuring a tight ply and minimal split risk. This combination stays comfortable in shoes, resists wear at high‑friction zones, and holds up after multiple washes. If you need colorfastness or machine‑washability, check fiber blends and care instructions before buying.
Analytically, nylon reinforcement distributes stress where the foot bends most, while the fingering weight keeps the fabric breathable. Avoid bulky or overly fuzzy options that can snag and wear unevenly in the heel and toe.
Toe‑up or cuff‑down for beginners?
For beginners, the practical answer is to start with toe‑up patterns to gain length control and ensure you don’t run short on yarn. However, cuff‑down is often easier for learners already comfortable with turning and heel shaping. The best choice depends on the pattern you choose and your comfort with increases or short rows. If you’re unsure, begin with toe‑up simple patterns to build confidence and test fit early.
How do I measure for sock size and gauge?
The direct answer is that you measure the ball of the foot circumference and the foot length, then compare to the pattern gauge (stitches per inch) on your swatch. Practically, crochet a 4x4 inch swatch in the exact stitch used for your project, wash/dry it, and measure both width and height; adjust your hook size to align with the pattern’s gauge. Consistency in swatching is more reliable than guessing shoe size.
What is negative ease and how does it affect fit?
Negative ease is a deliberate difference between the fabric’s finished circumference and the actual foot measurement. The direct answer is that a small amount (about 5–10%) helps the sock stay up and look like a real sock; too much can feel tight, while too little causes slippage. Practically, apply negative ease in the cuff or at the instep to maintain a snug fit without binding the ankle. Start with a small adjustment and test by trying the partially completed leg on as you go.
How should I swatch for crochet socks?
The direct answer is to crochet a 4x4 inch swatch in the exact stitch pattern and yarn you plan to use, then wash and dry it to see how the gauge shifts. In practice, label the swatch with hook size, yarn weight, and pattern; compare its gauge to the pattern’s gauge and adjust hook size or stitch count accordingly. This reduces later surprises in size and fit, especially with yarns that bloom after washing.
How do I care for crochet socks to extend life?
Directly, follow the yarn’s care instructions, typically gentle machine wash or hand wash and lay flat to dry. In practice, avoid hot drying which can felt or shrink; block socks gently to settle stitches. Regular wear with proper care maintains elasticity and prevents pilling or seam wear at the heel. A label‑friendly routine makes the socks durable over many wears and washes.





Add a comment
To comment, you need to register and authorize
Comments