

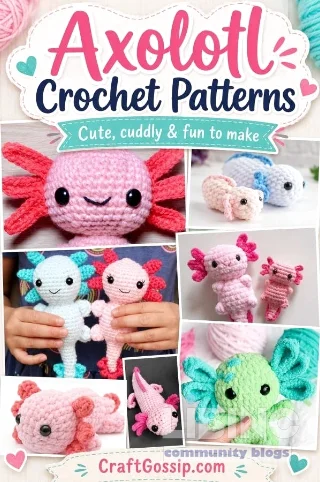
Axolotl Crochet Patterns: An Analytical, Practical Guide to Designing Plush Amigurumi
- Analytics-driven overview
- Contrasts in pattern construction and yarns
- Causes and effects: shaping, gauge, and safety
- Expert reconstruction: best practices and design tweaks
- Yarn selection, color ideas, and practical tips
- Safety, maintenance, and project closing notes
Axolotl crochet patterns reveal a design space where whimsy meets technique. Their feathery external gills and perpetually cheerful faces make them instantly recognizable in any amigurumi collection. The patterns range from tiny keychain miniatures to large, plush cousins, each inviting a mix of color play and shaping challenges. This article approaches axolotl patterns from a practical, data-informed perspective, evaluating construction methods, material behavior, and safety considerations that affect real-world outcomes.
From a crafter's viewpoint, the main question is not just what to crochet but how to optimize the process for reliable results. By framing patterns as a system—yarn weight, hook choice, stitch density, and finishing touches—we reveal why some designs sing and others sag. This lead-in checks assumptions about color, scale, and play value, and sets up a practical guide you can apply to any axolotl crochet project in your queue, whether for gifts or stalls. amigurumi
Analytics-driven overview
Pattern frequency and form show distinct curves in the axolotl crochet world. The most popular formats cluster around simple, in-the-round bodies with detachable gills that invite contrasting colors. This distribution favors amigurumi enthusiasts who value symmetry and repeatability, yet it leaves room for improvisation in color blocks and texture. The result is a living catalog rather than a static set of diagrams, because makers continually test tweaks that improve stitch visibility and overall balance.
Amigurumi considerations shape how designers think about finishing, seam placement, and the perceived scale of the toy. The best patterns keep the core body straightforward, reserving the most expressive work for the gills and head where color and texture can do the heavy lifting. In addition, a growing number of patterns provide no-sew or minimal-sew options that broaden accessibility for beginners while offering room for experimentation for advanced crafters. chenille yarn
External gill frills provide a focal point for color theory and technique. The patterns that rely on bobble stitches for the gills challenge beginners and reward careful color placement, while others keep a flat gill profile for cleaner shaping. When the gills are created with a stranded or variegated yarn, the same design aesthetics can yield surprisingly different personalities with only a change of palette. amigurumi
Amigurumi outcomes depend on consistent gauge and stuffing distribution. In the no-sew efforts, the absence of legs challenges the designer to imply limbs with color changes and shaping alone. This analytic snapshot highlights how even small shifts in tension and round count ripple through the finished toy, altering both pose and play value. Lightly stuffed bodies hold shape better in compact designs, while softer fills support a cuddly, huggable feel in larger models.
Practical takeaway: the most reliable axolotl patterns use a modest set of shaping primitives—simple increases, controlled decreases, and a few strategically placed color joins. For the majority of makers, consistency in the first 6–8 rounds determines the look of the entire figure. Amigurumi polish comes from aligning base geometry with the more expressive gill structure, then carefully blending color transitions to avoid visible stair-stepping in the round. no-sew
Contrasts in pattern construction and yarns
Pattern construction contrasts reveal a spectrum from quick, no-sew builds to more deliberate, multi-piece assemblies. The no-sew axolotl often relies on a single continuous piece for the body with minimal attachments, while other designs split the body, tail, and gills into separate components. The contrast matters because it determines both speed and sturdiness in finished toys, especially when they are intended for children or frequent handling. amigurumi
When you compare yarn choices, cotton and smooth acrylic yarns offer crisp stitches and easier visibility of increases and color changes. They suit traditional amigurumi forms where definition matters most. Chenille and blanket yarn create irresistibly soft, chunky figures that exude plush comfort but make stitch counts harder to track. The trade-off is worth it for display pieces or market-ready plush that begs to be hugged, even if it requires a little extra attention to gauge. no-sew
Color strategy becomes a design tool in its own right. A pale body with bright pink gills is classic, yet many crafters are pushing toward lavender bodies with vivid neon accents or speckled bodies paired with solid gills for a striking silhouette. The same base pattern can yield vastly different personalities with a careful palette, demonstrating how color theory translates directly into perceived character and charm. amigurumi
Amigurumi designers also experiment with scale by adjusting yarn weight and hook size. A larger axolotl using bulky chenille becomes a tactile statement piece, while a small cotton version functions well as a keychain or desk buddy. The scaling dynamic is not merely aesthetic; it changes how you stuff, reinforce joints, and secure accessories like the eyes. light-handling often reduces the risk of overstuffing, which can distort the torso and head. no-sew
To support makers across skill levels, you’ll find a spectrum of pattern formats in this space, including tiny 5–6 cm miniatures and bigger, approximately 10–12 inch models. Each format teaches different lessons about balance, proportion, and finish quality. The most valuable pattern families share a common language: clean rounds, visible gill structure, and predictable color joins that keep the assembly process efficient and satisfying. amigurumi
Causes and effects: shaping, gauge, and safety
Understanding how changes in yarn weight and stitch density affect the final silhouette is essential. A heavier yarn or larger hook increases the circumference of the body and can make the gills look oversized if not balanced with proportional head and tail shaping. This cause-and-effect logic helps you predict outcomes before you commit to a project and reduces the guesswork that often leads to misproportioned toys. amigurumi
Gauge consistency is the quiet determinant in every axolotl design. If your stitches pull too tight, the body becomes stiff, lines appear skewed, and the finishing clips may not align with the intended shape. If your stitches are too loose, you risk floppy extremities and wobbling gills. The balance point is achieved by swatching, using a stitch marker to track rounds, and adjusting stuffing depth as you go. no-sew
Color placement around the gill frills is another weighty factor. When you switch from a single solid color to variegated or self-striping yarns, you must plan where the color shifts occur to preserve the gill silhouette and prevent color pooling that distorts the form. The design becomes a study in color coordination, where even a small misstep in hue distribution can alter perceived scale. amigurumi
Safety considerations are non-negotiable for toys intended for children. Safety eyes are convenient but not suitable for babies who may mouth or pull components. Embroidered eyes with black yarn or embroidery thread offer a safer alternative. Attach limbs, tails, and gills securely, and choose washable yarns that tolerate frequent handling and accidental spills. This is a practical baseline for durable, kid-friendly axolotl projects. no-sew
When you combine all these factors, you see that the axolotl pattern is a micro-ecosystem of decisions. The yarn weight, stitch density, color strategy, and seam planning all interact to determine whether the final toy reads as energetic, cuddly, or quirky. The best designs balance these forces, delivering repeatable results that you can reproduce across multiple projects. amigurumi
Color ideas expand the creative boundary beyond pink. Aqua with deep blue gills, lavender bodies with hot-pink accents, or a white body with rainbow gills all work as long as the contrasts remain legible in the chosen lighting. Variegated yarns can be bold, but they often require neutral gill and limb colors to avoid visual chaos. amigurumi
Safety tips for handmade axolotl toys emphasize simplicity and durability. If you use safety eyes, they must be securely anchored and reinforced, or you opt for embroidered eyes to reduce choking hazards. Ensure every tail, gill, and limb attachment is firmly anchored, and verify that the toy can withstand gentle squishing and occasional rough handling. Washable yarns are highly recommended in children’s design work. no-sew
Expert reconstruction: best practices and design tweaks
The expert approach begins with a clear plan for the base body. Start with a simple round or oval that scales smoothly, then add a neck and head that taper for a friendly profile. Use a minimal number of increases in the first few rounds to avoid a bulbous front, which can throw off the overall silhouette once the gills are attached. amigurumi
Next, design the gills as the feature that communicates personality. You can attach external frills, build them with split-color bobbles, or crochet them as separate panels that clasp to the head with secure seams. The key is to keep the joins invisible or neatly integrated so the toy reads as one cohesive creature. chenille yarn
Color planning must align with the intended scale and audience. For a display piece, consider neutral bodies with contrasting gills and feet to highlight the oral-and-dorsal features. For kids’ toys, use brighter, more forgiving hues and ensure the eyes and mouth are stitched rather than glued to avoid detachments during play. amigurumi
Seasoned crocheters often customize patterns by adding subtle textures around the body using alternating stitches or small clusters. You can introduce a tiny fin along the tail, or a delicate fringe along the gills to emphasize movement. Each modification should be tested on swatches before committing to the final toy to preserve balance and avoid unplanned bulk. no-sew
For market-ready or gift-focused projects, consider a small, no-sew family variant that lets you crochet a parent-and-baby set or a whole school of axolotls in complementary colors. This approach amplifies display value and provides a narrative for customers or recipients. Amigurumi design logic ensures you maintain consistent scale across family members while letting color differences do the heavy lifting. amigurumi
Finally, document your process and pattern adjustments. Keeping notes on yarn type, hook size, gauge, and stuffing amount makes it easier to recreate the result or adapt it for new color stories. If you share your patterns publicly, provide clear diagrams for gill attachment and seam placement to help other makers reproduce your success. no-sew
In summary, the axolotl crochet pattern family thrives on a disciplined base geometry, expressive gills, and thoughtful color systems. By treating each project as a small system of decisions, you gain predictability and confidence, whether you’re crafting for a craft fair, a gift box, or a shelf of whimsical friends. amigurumi
Safety-conscious makers can further optimize results by choosing washable yarns and using embroideries instead of small components for eyes and noses. A final test: try several stuffing levels to see how firmness affects the toy’s pose and resilience in play. With careful planning and steady practice, axolotl crochet patterns become reliable, satisfying projects that reward both technique and imagination. no-sew
Color and pattern ideas continue to evolve as crafters experiment. Suggestions include Minecraft-inspired color blocks, speckled palettes, and soft greys punctuated by dusty rose details for a more nuanced look. This ongoing experimentation preserves the charm of axolotls while inviting new creative twists that keep the pattern family fresh and relevant for years to come. amigurumi
As you explore this collection, remember that the joy of crochet comes from making something uniquely yours. The same axolotl pattern can become a day-brightening toy, a thoughtful gift, or a standout item at a craft stall. The key is to balance technique with play, ensuring your finished piece remains both durable and delightful to hold. no-sew
In short, this analytical guide helps you navigate the variety of axolotl crochet patterns with confidence. It highlights which approaches scale well, how to choose yarns for desired texture, and how to finish with safety and care. The result is a practical framework you can apply to any axolotl pattern in your queue, turning a simple amigurumi idea into a well-executed, lovable plush. amigurumi
Whether you seek a tiny keychain or a cloud-soft plush, the axolotl crochet pattern family offers a spectrum of routes from quick wins to more intricate builds. The secret lies in understanding the interaction between base shape, gill drama, and color logic. With that knowledge, you can craft a rainbow of axolotls that stay charming, safe, and mechanically sound for years of play. no-sew
Closing note: once you finish your first axolotl, you may find yourself drawn to a small family of friends in the same style. The momentum of that first success often fuels a whole collection, each piece reinforcing the lessons of gauge, attachment, and color balance that define high-quality crochet amigurumi. amigurumi
In the end, the axolotl is not just a pattern but a design testbed for understanding how yarn, technique, and imagination converge. This article has traced the central threads—structure, variation, and safety—while inviting you to push further with your own color stories and finishing touches. Your next axolotl is waiting, ready to become a familiar, cheerful companion on your craft journey. no-sew
As you finalize your project, share a photo of your axolotl with your community and reflect on what you learned about the interplay of body, gills, and texture. The conversation around axolotl crochet patterns is as much about technique as it is about play, and each new toy adds another layer to the evolving craft conversation. amigurumi
Conclusion: the enduring appeal of axolotl crochet patterns lies in their balance of simplicity and character. By attending to core shaping, deliberate color decisions, and careful finishing, you can produce durable, endearing amigurumi that transport a splash of whimsy into everyday life. no-sew
Closing the practical workflow: a gauge-to-size system
The article lays the groundwork, but crafters benefit from a compact, repeatable process that converts yarn weight, hook choice, and stuffing depth into predictable axolotl shapes. This section presents a concise workflow you can apply to any pattern, with concrete targets for gauge, proportions, and finishing that keep color drama and gill detailing legible.
TABLE: yarn weight, hook, gauge, and typical project
| Yarn weight | Fiber type | Recommended hook | Gauge (st/10 cm) | Typical project |
|---|---|---|---|---|
| Fine / Sport | Cotton blends | 2.0–3.0 mm | 28–32 | Mini keychain |
| DK / Light | Acrylic | 2.5–3.5 mm | 22–28 | Standard plush |
| Worst. / Aran | Wool blends | 3.5–4.5 mm | 20–24 | 10–12 in model |
| Bulky / Chenille | Chenille | 5.0–6.0 mm | 16–20 | Large display plush |
| Specialty | Cotton velvet | 3.5–4.0 mm | 24–28 | Soft finish display |
Tip: swatch at 10 cm and compare to target; minor hook changes can adjust 1–2 rows per round and keep the gill silhouette crisp. This makes it easier to scale up or down without reworking core geometry, preserving the character of the amigurumi while adapting to different yarns and project sizes.
- No-sew path: crochet a seamless body, attach gills with surface stitches, plan color joins so gill shapes stay distinct.
- Seamed path: crochet body and head separately, join with hidden seams, embed eyes after assembly to avoid detachments.
- Color strategy: map palette to enhance gill visibility against body, test palette on a swatch before final work.
- Finishing: stuff gradually, adjust firmness for pose stability, reinforce joints for durability.
In practice, treat the axolotl as a small system where base geometry anchors the look, while color and gill detailing carry personality. This approach translates well across sizes, from compact keychains to shelf-ready plush, and supports consistent results when patterns are modified for display or sale. amigurumi
Frequently asked questions
What yarn weight is best for axolotl amigurumi?
For most axolotl projects, DK-weight yarn offers the best balance of speed, stitch definition, and durability, enabling reliable results across a range of patterns and project sizes. In practice this means choosing a smooth acrylic or cotton blend and pairing it with a small hook (2.5–3.5 mm) to land a tidy, dense fabric that holds shape when stuffed, while still allowing color changes and gill detailing to read clearly. For babies or extra-soft toys, switch to a lighter fiber for more pliable texture, but maintain a firm stitch density to keep form intact. This choice supports consistent scale from 8–12 cm minis to larger 10–12 inch models.
Analytically, DK weight reduces distortion during shaping and minimizes noticeable stuffing gaps, while still giving enough bite for clean seam lines and crisp color transitions.
How do I select colors to maximize gill visibility?
Choose a body color with high contrast against the gills; cool bodies with warm or neon gills provide strong silhouette separation, while softer palettes read as cohesive and friendly. In practice, test two or three shade combos on a swatch before committing, ensuring the gill edges remain crisp when viewed from typical play angles. This approach helps maintain readable gill shapes across lighting conditions and different display setups.
Analyzably, color contrast drives perceived character and scale; a brighter gill against a muted body emphasizes movement and cheer in the final figure.
Are safety eyes required for axolotl toys?
Safety eyes are convenient but may not be suitable for very small children; embroidery or stitched eyes reduce choking risk and can be adjusted for expression. Practically, sew or embroider eyes firmly, reinforce attachment with a small back stitch, and consider a passive mouth line or tiny embroidered details for added character. If you use safety eyes, choose larger sizes and secure with external backing or extra stitching through the body to prevent loosening.
From a durability perspective, stitched features tend to survive frequent handling better and simplify washing, which is important for market or gift items.
How can I adapt patterns for different scales without reworking the base geometry?
Scale changes hinge on yarn weight and hook size while preserving the core shape. Begin with a baseline swatch and maintain proportion by adjusting the body-to-gill relationship, increasing in the same stitch pattern, and keeping the same round counts in the head region. For example, move from DK to worsted by stepping up the hook by one size and increasing stuffing depth slightly to keep the silhouette balanced. This allows you to produce multiple size variants while maintaining charm and proportion.
Practically, maintain consistent increases and decreases in the same places to keep symmetry intact, then test gill attachment to ensure readability of those features at every scale.
What finishing tips improve durability and play value?
Finish with secure joins, reinforced seams, and washable yarns; embroider eyes and mouth rather than glueing components for better longevity. In practice, stitch gill frills with small, tight backstitches to prevent flutter, and stuff gradually to support pose without distorting the torso. Washable yarns ensure repeated handling resists wear, while careful color joins prevent visible stair-stepping in the rounds.
Conceptually, the finishing touches are the difference between a cute demo and a toy that endures daily play and long-term display.
How do I ensure safety when making axolotl toys for kids?
Prioritize secure attachments and non-detachable features; use embroidered or felted eyes, secure gills, and no loose components. In practice, test the toy with gentle pressure to confirm that eyes, gills, and limbs stay fixed under normal play, and choose washable yarns so the surface remains durable after handling and cleaning. For babies, avoid small parts entirely and choose minimal-sew or no-sew methods that rely on safe color changes rather than extra attachments.
From a safety perspective, simple verification through a slow-tun test is essential to ensure resilience during typical use.





Add a comment
To comment, you need to register and authorize
Comments